Monday, June 24, 2019

Universal Design Tips and Tricks: Managing Text

 TEXT TIPS & TRICKS


Left Justify
Whenever composing paragraphs and sentences, always remember to left justify. Justifying both left and right (full justification) can create visual issues for people with dyslexia and other sight impairments. To see what a dyslexic person sees, refer to this simulation:


Dyslexia Simulator


Bold and Oblique
Many screen readers will not recognize bold or italics. Instead, simply use the word "Important:" preceding the text to be emphasized.

Typeface
Not to be confused with font (size and style), typeface refers to the design of the type. While debated among the accessibility community, a general heuristic is to use a sans serif typeface, such as Arial or Verdana.

Font
Font refers to the size and characteristics of the typeface. In general, you should always use 12 point or larger in electronic documents. For on-ground learning spaces, the general size heuristic is one inch of letter height for every 10' of room.

Spacing
Avoid extra spacing after sentences and after paragraphs. Generally, one space is a good heuristic. Also, avoid pressing the Return or Enter key multiple times to force paragraphs to a new page. Instead, use a Page Break.


Tabs
Use Tabs, indents, and the Ruler to align text. Never press the space bar multiple times to move the position of the text input cursor.

Color Contrast

Use color sparingly and be sure there is enough contrast. WCAG 2.0 AA guidelines specify 4.5:1 for regular type and 3:1 for type that is 18 point or larger (14pt bold). To check color contrast, we recommend the free Color Contrast Analyzer from the Paciello Group.

Color
Many users cannot distinguish colors. This is especially true among males who carry a recessive gene linked to color blindness. When conveying color to emphasize content, include alternative visual queues, such as hash marks and symbols to convey meaning.

Links
Avoid copying and pasting entire web links. Screen readers have difficulty reading long URLs. (CAST indicates short URLs are acceptable.) Instead, link to the site using natural language. If users will be printing the document, include the URL by prefacing it with the words "Web link" adjacent the natural language link. Users can also set Word to print the URL rather than natural text link. To do this, open Word > Options > Advanced > scroll down to the Print group > check the box next to Print Field Codes Instead of Their Values. When printed, the document will display {HYPERLINK "https://the.embedded.url"} Also, avoid using non-descriptive links, such as "click here" that do not describe the link destination. Finally, links should look like links. They should be the default link color and contrast, and include link focus attributes.


A good web link: Microsoft Word Help Center
A so-so web link: https://support.office.com/en-us/word
A bad web link: Click here

Headings
Always use headings. Screen readers rely on headings to navigate pages. A good heuristic is to use only one H1 per document. Reserve that H1 for the title of the document. For sections breaks use H2 and H3 headings. Be sure to keep them in hierarchical order. Never use an H3 before an H2 in the nesting hierarchy.


Bullets
Use the native/built-in bullet feature in Word. Don't ad lib bulleted lists using asterisks or other keyboard symbols. Screen readers can read Word bullets. They will have difficulty with non-native bullet lists.  


Blinking text
Avoid text that blinks. Such text can induce seizures in some people.

Spacing
Use proper line spacing to improve readability. Properly using white space between paragraphs has been proven to increase comprehension up to 20%, as pointed out by usability expert Dmitry Fadeyev.


Sentence Spacing Example from Microsoft


__________________________________

Good spacing aids readability. Image credit: Microsoft


Line Length
About 60 characters per line is ideal. Users can lose their place when reading long sentences up to 90 characters.


Sentence length example courtesy Material Design
Image credit: Material Design


Friday, May 31, 2019

Vericite is Changing to Simcheck


Later this summer, ESU Learning Technologies will be converting our plagiarism detection software from Vericite to Simcheck. Actually, Vericite was acquired by Turnitin about a year ago. The product Turnitin developed to replace Vericite is now branded as Simcheck. While it mostly works the same as Vericite, it will have even better features, such as the ability to check for plagiarism scores within discussion forums. To learn more, check out this short integration video. In the meantime, watch our blog and Twitter feed for details regarding the dates for the switch.

Friday, May 24, 2019

Make a PDF Image File Searchable and Selectable


Have you ever encountered a scanned (non-searchable) PDF document and wondered how to make it both searchable and text-selectable? Well, you can actually do that right from inside Acrobat DC. Here's how.

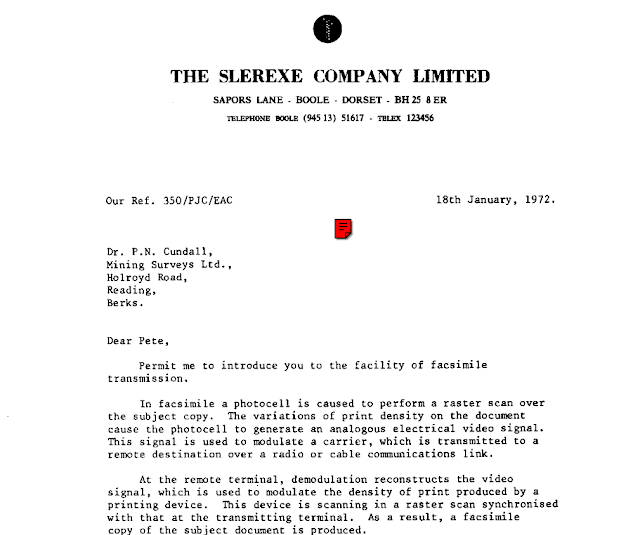
First, we start with a scanned/photocopied PDF, like this example below. Note that this document is essentially an image:
Learning Tech Newsletter


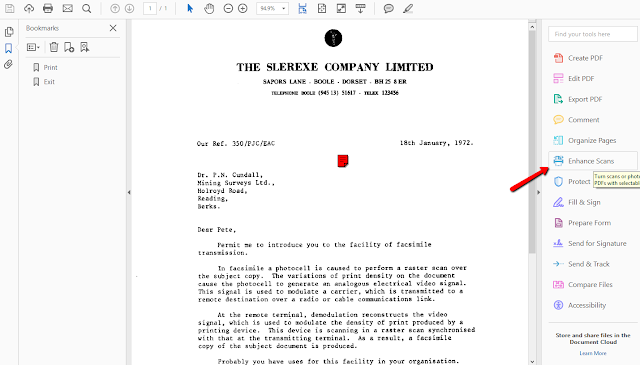
From inside Acrobat DC, select the Tools tab > browse and locate Enhance Scans to add this utility to your Tools menu. Once added, click the Enhance Scans Tool to start the OCR process.
Acrobat Pro Enhanced Scan Tool Selector


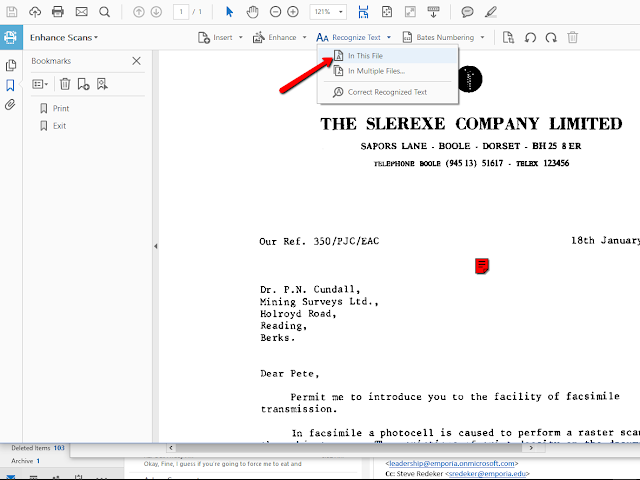
Next, click the Recognize Text tab that appears across the top > In This File sub-option.


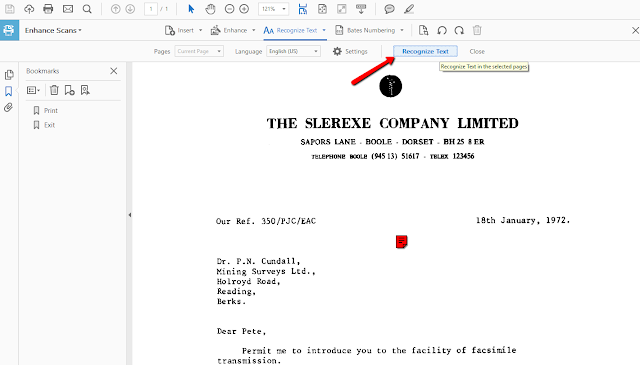
Next, click the Recognize Text button that appears below the tabs.
Adobe Acrobat Recognize Text Menu Button


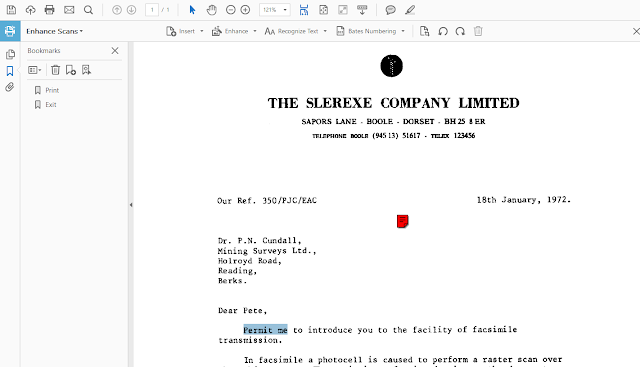
After completing the scan, the document will be in a searchable and text-selectable format that is ready for accessibility tagging!

Friday, May 3, 2019

Which Video Tool Should I Use?


Emporia State supports three instructional video resources for faculty and staff: Kaltura, Zoom, and Panopto. What's the difference between these tools and why are there so many options? Which one is the best option for accessibility?

To answer that question we need to provide a brief product history to understand how we got here. Roughly ten years ago, the Counselor Education on campus program needed a solution to replace an aging VHS recording system. Panopto, a new lecture capture product developed at Carnegie Mellon, provided the perfect solution. It integrated into the campus LMS, supported two camera recording capabilities, could be used in multiple rooms at the same time, and was completely digital. Since then it has been used to record and upload thousands of videos. 

About the same time, the campus migrated its webconferencing system from Wimba (later acquired by Blackboard) to Adobe Connect. Webconferencing software had a very narrow niche in the mid 2000s - there was virtually no overlap between a lecture capture product and a webconferencing product.

Fast forward a few years, the campus has since replaced Connect with Zoom and acquired Kaltura. Like Connect and Wimba before it, Zoom is branded as a webconferencing/meeting product. Kaltura, in contrast, is branded/marketed as a video hosting, streaming, and curation product. Again, little or no overlap among products a few years ago, but that's changing. 

Each of these products, which are still very viable and highly ranked in Gartner's Magic Quadrant, are now vying to expand their reach and become a one-stop solution for lecture capture, desktop recording, curation, and more. However, shifting a campus that is deeply entrenched in each product to a single solution is easier said than done. Hence, we're likely going to continue licensing these products indefinitely. Let's break these down and see which product is best to use for your purposes:

Zoom

The primary application of Zoom is live meetings. The campus supports approximately 600 Zoom meetings every month during the semester. However, Zoom can be used for much more:
  • Live meetings - Best Use 
    • Support for 100 simultaneous participants
  • Live webcasting 
    • Support for up to 1000 simultaneous participants
    • Two-way communication limited to chat
  • Screen capture/recording 
  • Lecture capture 
  • External video upload 
  • Cameras
    • Single 
    • Dual 
  • Desktop and mobile app 
  • Accessibility 
    • Automatic captions ✘ (forthcoming)
    • Automatic transcripts 
  • Cross product integration
    • Panopto (Possible, but not currently supported at ESU) ✘
    • Kaltura 
    • Canvas (Limited) ✓ 
  
Panopto


The primary application of Panopto is lecture capture. The campus supports approximately 200 lecture captures every month during the semester. Like Zoom, Panopto can be used for much more: 
  • Live meetings 
  • Live webcasting 
    • Support for up to 10,000 simultaneous participants
    • Two-way communication limited to viewer Notes and Comments
  • Screen capture/recording 
  • Lecture capture - Best Use 
  • External video upload 
  • Cameras
    • Single 
    • Dual 
  • Desktop and mobile app 
  • Accessibility 
    • Automatic captions 
    • Automatic transcripts 
  • Cross product integration
    • Zoom (Possible, but not currently supported at ESU) ✘
    • Kaltura 
    • Canvas (Deep) 


Kaltura

The primary application of Kaltura is video hosting, curation, and streaming playback. The campus supports approximately 600 monthly hours of video playback/viewing during the semester. Like Zoom and Panopto, Kaltura can be used for much more: 
  • Live meetings 
  • Live webcasting 
  • Screen capture/recording ✓
    •  Using Kaltura Capture desktop app
  • Lecture capture 
  • External video upload Best Use 
  • Cameras
    • Single ✓
    • Dual 
  • Desktop and mobile app ✓
  • Accessibility 
    • Automatic captions 
    • Automatic transcripts 
  • Cross product integration
    • Zoom 
    • Panopto 
    • Canvas (Deep)