Monday, December 30, 2019

Creating Accessible Google Docs


Courtesy of Lisa Dickson, Hutchinson Community College

Fonts & Typeface
  • Use Sans Serif typeface (eg Calibri, Verdana, Helvetica, Arial, Trebuchet)
  • Use size 12 point or larger typeface
  • Left-justify text
  • Don't use bold or italics (many screen readers won't announce them). Instead, add the word "Important" or "note"
Color
  • Use sufficient color contrast
    • We recommend the Colour Contrast Analyzer - a free download
    • The color of the page can be changed using the File menu > page Setup > Page Color. Choose a typeface with sufficient color contrast
    •  Don't use color alone to convey meaning


Links
  • Use descriptive links (eg visit the PBS website
    •  Don't spell out URLs (eg http://www.pbs.org) or use the words "click here"
      • Highlight the text that needs to be linked > right-click and select Link or select the link icon from the toolbar
  • If a URL needs to be included for printing, include it in parentheses following the descriptive link, but don't hyperlink (to avoid duplicate links)
Headings
  • Use Styles to format text as headings
  • Don't use large, bold font as a heading
    • Highlight the text that should be a heading, then use the Styles menu or the Format menu to select the appropriate heading level

  • To change the appearance of a Heading Style, make the formatting changes to the text, highlight that text, and then use the Styles or the Format menu to select "Update heading 'some text' to match"
  •  Use Headings in the correct order. Don't skip Heading levels. (eg Heading 1 to Heading 3)
    • You can check levels using the View menu > Show Document Outline 

  • The Title and Subtitle should only be used for a document with a title page. Normally only one Title and Subtitle per document
  • Use Heading Level 1 only once in a document
  • Headings go as far as Heading 6
Lists
  • Use numbered or bulleted lists from the Format menu. Don't manually type numbers, asterisks, hyphens

 Columns
  • Use the Columns option in the Format menu
  • Do not use tabs or tables to format text
 
Images & Graphics
  •  Always use alternative (alt) text to describe images
    • Alt text should be short and descriptive. Don't be overly wordy. 1-2 brief sentences is recommended
    • Avoid using the word "image" or "picture" in the alt text because the screen reader will already announce that it's a picture or image
  • Select the image > right-click > select Alt text. Enter the alternative text in the Description box
    • If an image contains text, that text should be included in the Alt text
    • For complex images that cannot be easily described, link to a separate document that descries the image or describe the image using text that appears above or below the image
  • Not all screen readers can read Google Docs Alt text, so consider adding a caption in the page as well.
  • Image positioning should be set to In-Line
  • Color alone should not be used to convey meaning
    • If you print the image in B&W, will it be understandable? If not, it is not accessible
  • Text within an image should have sufficient color contrast against the image background
Tables
  • Tables should be used for data relationships only, not for layout and formatting
    • Insert menu > Table > select the table size
  • Keep tables small and basic so that they are understandable without Header Rows
    • Google Docs does not allow you designate Column and Header Rows which are used to announce table elements
      • Still include a Header Row (don't start with data in the first row). Screen readers automatically read the first row as a Header Row
      • Table cells should not be empty, including the top-left cell
      • Avoid split, merged, or nested cells as they can change the reading order of the table
  • Test the reading order of the table
    • Click your cursor in the top-left cell and repeatedly press the Tab key. The cursor should move from left to right and top to bottom through the table
Navigation Landmarks
  • Landmarks such as headers, footers, and page numbers help readers navigate a document, which is especially helpful for long documents
    • Insert menu > Header and Page Number
Table of Contents
  • A Table of Contents is recommended for longer documents to improve navigation for assistive technologies.
    • If you do this after creating the document and if Heading Styles have been applied, a ToC with clickable links will automatically generate
    • Place your cursor where you want to insert the ToC. From the Insert menu > select Table of Contents and select the format
Comments & Suggestions
  • Use the Comments & Suggestions tools. Screen readers can jump to them
    • Don't write comments or notes within the document itself.
      • Comments
        • Highlight the text or object on which you want to comment > click the Comment button on the toolbar. Or Insert > Comment
      • Suggestions
        • From the top-right corner, use the drop-down to select Suggesting. If you don't see that option, ask the file owner to enable the permission

        • When you edit document text using Suggestions, you will see your changes in a new color. Anything you delete will appear as a strike-through. Notes of your edits are made in the right margin
Downloading a Google Doc
  • Google Docs can be downloaded in multiple other formats
    • File menu  > Download as...
  • Don't save as PDF or Print to PDF as the tagging will be stripped
    • Instead, download as Word and then convert to PDF
  • Check the downloaded document for accessibility
    • Even if the Google Doc is accessible, the converted file might not be
Math & Science
  • Use EquatIO or Mathtype to create accessible math equations.
  • Equations cannot be written in an accessible format using the Google Docs Equation Editor
Forms
  • Use Google Forms, not Google Docs
Checking your Google Doc Accessibility


Thursday, December 5, 2019

Vericite is Changing to SimCheck


Over the 2019-2020 holiday break, ESU will change the Vericite plagiarism detection software to SimCheck (Similarity Check) - created by the parent company Turnitin. Below we've listed a few common questions we anticipate with respect to this change.
  • Why is it changing? Vericite was acquired by Turnitin roughly two years ago. As part of that acquisition, the Vericite product has been discontinued and is being replaced with a completely new product developed by the Turnitin company called SimCheck. 
  • Why does ESU need to change now? The Vericite product is no longer updated and support is limited. It is scheduled for end-of-life (EOL) in a few months. Technically, we could wait until summer to convert, but that delay will likely disrupt courses. We've determined that the transition will be less disruptive if completed over the holiday shutdown when courses are not actively running. The actual change will occur on December 17th.
  • Does it integrate into Canvas? Yes. It will work very similar to Vericite. (See video links below.) There will be a checkbox in the Assignment area that allows faculty to add plagiarism detection to student submissions. And just like Vericite, faculty can see similarity reports from within the Speedgrader and the gradebook.
  • Can faculty 'direct submit' an assignment? Yes. Unlike Vericite which did not support Direct Submissions (eg submitting papers without creating a Canvas assignment), SimCheck allows submission outside of Canvas. Moreover, faculty can submit multiple files at once.
  • How quickly are similarity reports created? That is up to the instructor. Reports can be immediate, after the assignment is graded, after a certain date, or never.
  • Where are the papers stored? Similar to Vericite, SimCheck can index student submissions in a university (private) repository that is not shared with other institutions. That was a primary reason ESU switched from the original Turnitin product several years ago. This important feature provides intellectual property protection for student work. Faculty also have the option of storing papers in a "standard" repository which is shared with other universities. Faculty can define institutional repository or a standard repository when creating the assignment. A feature called Submission Indexing gives faculty the option to compare papers to other student papers within the institution.
  • What happens to the Vericite Data when we change? Turnitin will make an institutional 'copy' of our data when they convert us to SimCheck. That means we can see historical information related to any assignments dating back to when ESU first licensed the product. This data will be available, but will not carry forward into SimCheck.
  • Is SimCheck accessible? Yes. SimCheck conforms to WCAG 2.0 AA accessibility standards.
  • How do I use it with Canvas? This USER GUIDE provides step-by-step information regarding using SimCheck within Canvas. Or, you can refer to the videos below.
  • How does SimCheck color indexing differ from Vericite? SimCheck Colors are actually easier to interpret than Vericite. They range from light blue (0% match) to dark blue (1-24% match), yellow (25-49%), orange (50-74%), and red (75-100%).  

Video Tutorials & Slide Deck:
For questions about SimCheck, please contact the Helpdesk at 5555 or helpdesk@emporia.edu 

Monday, September 30, 2019

New Official Style for Digication


Dear Digication Community,

We hope this message finds you well!  We have some exciting news to share with you.

In 2016, we launched New Digication, updating the look and functionality of our ePortfolios in order to provide an improved user experience. New Digication has been a resounding success, with countless users expressing their appreciation for the sleek, modern interface, and we have continued to update and improve it since its initial launch.  

Today we are announcing Digication Kora! Digication Kora is the new official style of Digication, which gives additional areas of the platform a look and feel that matches New Digication ePortfolios.

The following areas have been upgraded to the style of Digication Kora:

·        The Dashboard
·        Featured ePortfolios and ePortfolio Directory
·        User Profile and User Directory
·        The Login Screen
·        Course Set-Up
·          
·          
We understand that schools will require ample preparation time to inform various stakeholders and update internal documentation when making this type of transition.  With this in mind, we are giving schools the option to enable Digication Kora for their systems anytime between now and January 1, 2020. 
We are also happy to enable Digication Kora on a per-user basis so that Digication Admins
and other early adopters can begin using the new interface before enabling it for the system as a whole.

Digication Kora will be automatically enabled for all schools on January 1st, 2020

The core functionality of the areas being updated will remain the same, so users should be able to begin using Digication Kora without any additional training; however, full documentation will be provided on Friday, October 4, and Digication will be announcing a number of webinar sessions to walk users through the new system. It will also be a topic of discussion at DigiCon 2019.  

Here are a few additional details which may answer questions you have about the new interface:

·        Digication Kora will be mobile friendly and will feature improved accessibility.
·        There will be improved branding options for your system, with the ability to customize your dashboard with a full-size background image and logo.
·        The ePortfolio directory will use an improved algorithm to sort ePortfolios based on recent activity.
·        The experience of creating an ePortfolio will be improved for users without any existing ePortfolios: a custom list of templates defined by the system administrator will be presented to the users.

We are excited to begin the transition to Digication Kora and we thank you for your patience and cooperation during the process!  If you are ready to begin using Digication Kora, you can request access by contacting support@digication.com. Your request will be processed within 1 business day. If you would like to enable Kora for specific users, please provide their names and email addresses.  Finally, if you have any questions regarding this update, we will be happy to answer them at support@digication.com.

Kind Regards,
Your Friends at Digication

Monday, September 9, 2019

Canvas no longer supports Internet Explorer


Instructure deprecated functional support of IE11 on August 3rd, which we had previously announced in the Canvas Community in April of this year. This meant that we would no longer be testing and running QA with our releases and updates in IE11. As of August 30th, the IE11 Browser has now had all support and access deprecated since current functionality in IE11 no longer reflects the quality user experience that users have come to expect from Instructure.

Any user who now tries to load Canvas using Internet Explorer is automatically redirected to an "Unsupported Browser" page and provides links to how they can upgrade to a Canvas-supported browser. We would suggest communicating this out to your users and working with your institutional IT teams to ensure that campus equipment be updated with browsers that are supported by Canvas.

If you have any questions or concerns, please contact Learning Technologies via the Helpdesk, or Mark Summey (msummey@emporia.edu), Hind Aati (haati@emporia.edu, or Rob Gibson (rgibson1@emporia.edu).

Monday, August 26, 2019

Canvas Scheduled Outage

Canvas Maintenance Saturday, Aug 31.


Instructure be performing maintenance on our Canvas instance starting on Saturday, August 31st at 10PM MDT and lasting until 2AM MDT the following morning. You may experience a short downtime during the maintenance period and we recommend that you make contingency plans for any processes that you have active during this maintenance window.

Tuesday, August 13, 2019

NEW! Blackboard ALLY Accessibility Reporting Feature


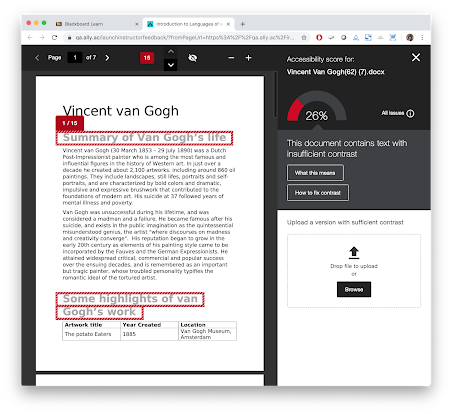
We're excited to introduce a brand new feature to our accessibility product called A11Y: A faculty-facing accessibility report. This report is intended to act as a complement to the existing accessibility indicators, and provides an accessibility summary and overview at the course level. 
 
The report shows the overall course accessibility score, the distribution of course content by content type and the list of all issues that have been identified in the course. The instructor can then easily see which content items in their course have been flagged with an issue, and is able to jump directly into the instructor feedback from the report.  

The course accessibility report also provides some help with prioritization, and will show different options such “Content that’s easiest to fix” and “Content with most severe issues” depending on the content in the course. The instructor feedback can again be triggered for each item, which should make working through the remediation of multiple items quite a bit faster. 

Next to this, the course accessibility report also provides a list of all the content that can be found in the course, including the ability to sort by severity, issue name, number of issues identified and accessibility score. The images below provide a visual as to what the report indicates.

ALLY Report Image 1

 ALLY Report Image 2 

ALLY Report Image 3
ALLY Report Image 4

ALLY Report Image 5


Monday, August 5, 2019

New for Canvas Fall Term-Course Copy, New Gradebook

Copy a Canvas Course

Are you ready for the Fall term? Here is some new information about copying course content.

Canvas has introduced a new feature when copying a previous course. Before searching for a previous course, make sure you check the 'Include Completed Courses' box.

Course Settings>Import Course Content>Copy a Canvas Course>:

This will allow you to search all of your previous courses.

New Gradebook

In January 2020, Canvas will switch all users to the new Gradebook:


Old Gradebook:

As you can see in the example, the grade columns will remain. The main differences are in where to find the various controls/filters.

You can continue to use the current gradebook during the Fall term. You can switch back-and-forth between the two gradebooks by going to Course Settings>Feature Apps. Toggle the New Gradebook on/off to switch between gradebook views. We are encouraging everyone to try the new gradebook during this Fall term before the change in January.

The Student gradebook view will not change.

As always, if you have questions, contact Rob Gibson (rgibson1@emporia.edu), Mark Summey (msummey@emporia.edu), or Hind Aaati (haati@emporia.edu).


Monday, July 15, 2019

Canvas July 13th Updates


New Canvas Features
July 13, 2019 Screencast


New Canvas Features
July 13, 2019 Release Notes

Refer to the Comprehensive Release Notes more details.


Tuesday, July 9, 2019

Flipgrid AR

Flipgrid AR Logo


What is Flipgrid AR?

Flipgrid AR (Augmented Reality) is a brand new feature enhancement to Flipgrid that allows users to create QR codes - either printed or embedded into web pages - that can be scanned using the new and improved Flipgrid AR mobile app. The QR code feature has been available for several years, but now it provides an augmented reality experience. Even older QR codes will leverage the AR experience. Once scanned, the QR code will trigger a recorded video which will begin playing in an augmented reality player. The technology behind the Android version of player is Google's ARCore.


What do I Need To Install?

Be sure the Flipgrid mobile app is updated. There is either an Apple or Android version available. The AR release was introduced in early July, so be sure you have the latest. For Android phones, you will also need Google's ARCore technology, but it will install automatically if it's not detected. You will not need a separate QR code scanner.


Steps

1) Log into the Flipgrid Admin Portal (you will need an instructor/teacher account) > access your Grid > access a discussion topic. Note that this feature will only work for already recorded videos. That's because a unique QR code is generated for each recording. Locate and click the "Print Response QR Codes" (see below).


Flipgrid Admin Portal Screen


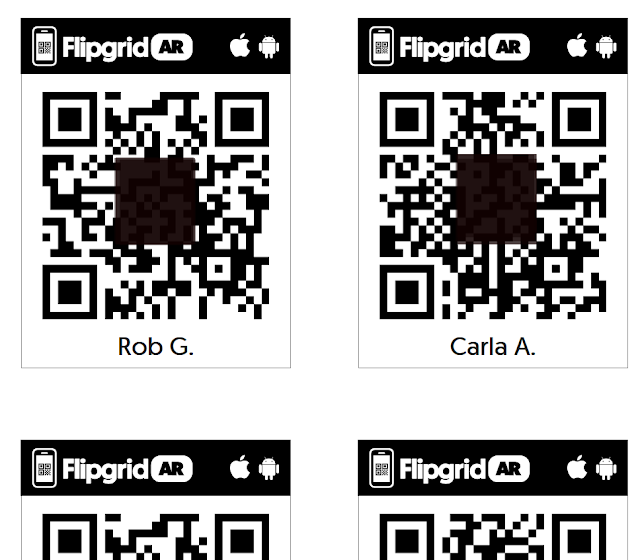
2) A unique QR code will be generated for each recording within the discussion topic. You can either print these codes or copy > paste them into a web site. I've intentionally obfuscated these codes.


Flipgrid QR Codes


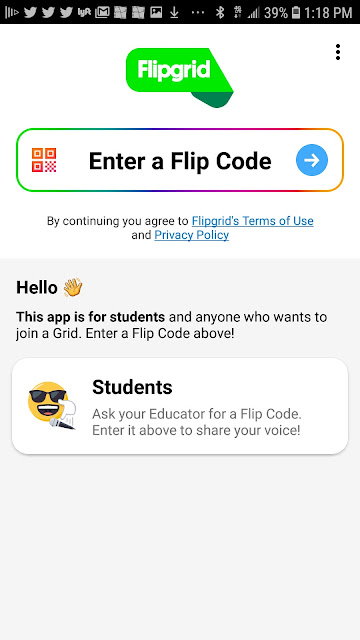
3) Open the Flipgrid Mobile App and locate/press the icon that looks like a small QR code to the left of "Enter a Flip Code".
 
Flipgrid Mobile Phone App
FlipGrid Mobile Phone App


4) A built-in Flipgrid QR code reader will launch. Point the reader at the code(s) until it fills the small code reader box. The border of the reader will turn green when it reads the code.


5) The AR video will automatically begin playing. Note that the video doesn't need to use a dedicated "player". It will play through Flipgrid without the need for a secondary product.

That's it! You're now viewing videos in augmented reality! As you move your phone around the room, the video will appear to 'float' on top of whatever is in the camera viewfinder! That's augmented reality.


Wednesday, July 3, 2019

Hypothes.is


What is Hypothes.is?

"The Hypothes.is Project is a new effort to implement an old idea: A conversation layer over the entire web that works everywhere, without needing implementation by any underlying site. Using annotation, we enable sentence-level note taking or critique on top of news, blogs, scientific articles, books, terms of service, ballot initiatives, legislation and more. Everything we build is guided by our principles. In particular that it be free, open, non-profit, neutral and lasting to name a few." (Retrieved from http://hypothes.is) 

How Does it Work?

There are actually a number of ways Hypothes.is can be used, including creating a custom "group" on the Hypothes.is web site. But we've made it easier by installing it into Canvas so that faculty and students can annotate directly inside a course site without having to create an Hypothes.is account. Once enabled, faculty can create annotation assignments for content pages they've uploaded.


Using Hypothes.is in Canvas

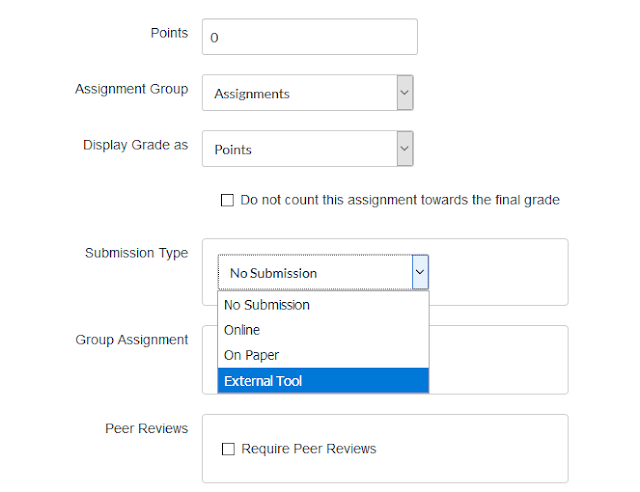
Step 1: Hypothes.is is an external Tool in Canvas. Depending on whether this annotation activity will be graded or not, set up a discussion, assignment, or stand-alone course page. Below I created an assignment and I selected External Tool as the submission type.

Adding Hypothesis to Canvas Step 1

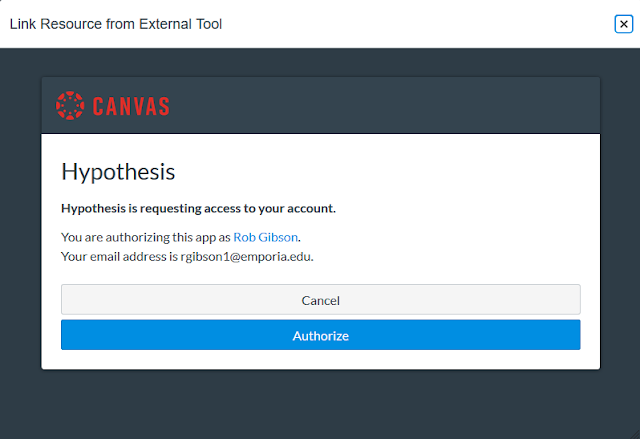
Step 2: Browse the list of alphabetical list of External Tools and select Hypothesis. You may be prompted for an authorization. This is normally a one-time setting.

Adding Hypothesis to Canvas Step 2


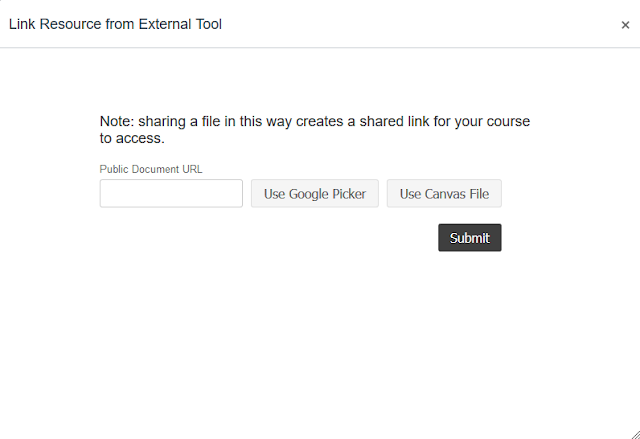
Step 3: Once authorized you will see a file picker option. You have two options: Google File Picker or Canvas Files. If using Canvas files they must be in an editable PDF format.


Adding Hypothesis to Canvas Step 3


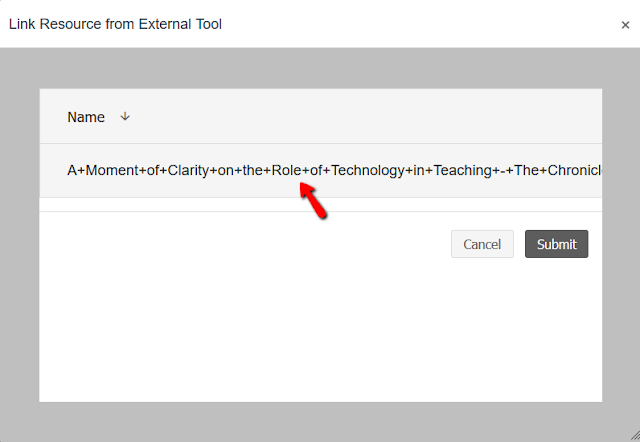
Step 4: Here I clicked the Canvas File option and selected the only PDF file I have uploaded to this course. The file must reside in the Canvas Files.


Adding Hypothesis to Canvas Step 4


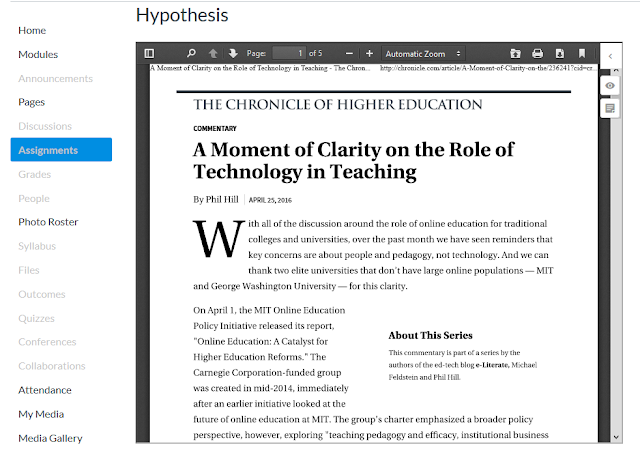
Step 5: When the file loads into Canvas you will see the Hypothes.is toolbar to the right. It slides left and right. Below is the "closed" option, followed by the "open" option.


Adding Hypothesis to Canvas Step 5


Adding Hypothesis to Canvas Step 6


Step 6: Hypothes.is presents four options:
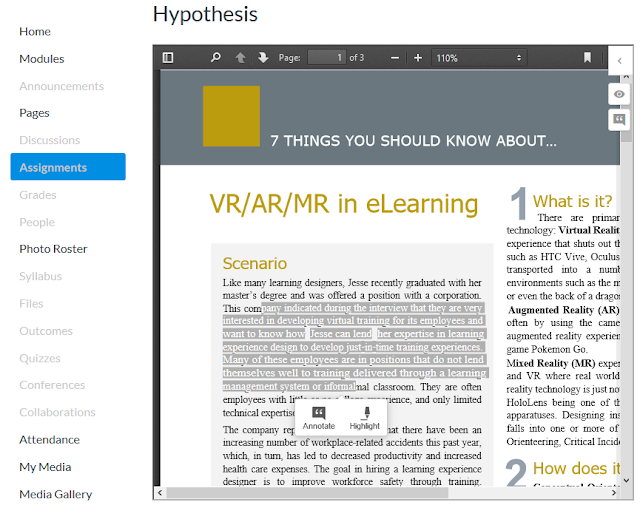
To annotate, simply highlight the desired text block. An annotate tool will automatically appear. When the annotation is associated with the text block, it will appear in the lower right, along with an annotation bookmark for easy reference. Again note that the PDF MUST be in an editable format. A PDF image file (non-editable) will not work.


Adding Hypothesis to Canvas Step 7


Step 6a: The highlight tool works the same way as the Annotate tool, but allows the user to highlight a text block for a notation. You can show/hide highlight by clicking the small eye icon.


Adding Hypothesis to Canvas Step 8


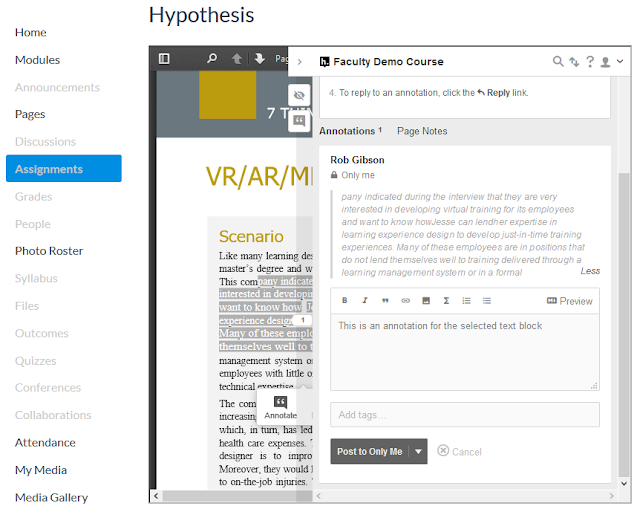
Step 7: Here you can see what an annotation looks like. The annotation appears below the highlighted text block. Users have the option of making the annotation public to the course participants, or private to themselves. Users can also reply to other annotations.


Adding Hypothesis to Canvas Step 9


Since I created this as a graded assignment, I can review each student's annotation and add the appropriate grade using SpeedGrader.