CREATING ACCESSIBLE ONLINE EXAMS
The following are some tips and tricks for creating accessible online exams, courtesy of Honorlock.
Leverage technology and provide accommodations. To complete an online exam students may need to use a few different technologies, such as a learning management system, proctoring software, and various assistive devices. Regardless of the technology, be sure that it’s fully accessible and that it integrates with the other technologies. You should also consider what accommodations students need to have equitable access and opportunity.
Accommodations for students during online exams can mean many things, such as extended time limits, adjusting due dates, allowing assistive devices, and providing different ways for students to answer test questions.
Assistive devices and technology in online learning refers to software, hardware, etc. used to help students learn, understand, and engage with exam elements regardless of their disability.
Common assistive devices include screen readers, assistive keyboards, and dictation software (speech-to-text & text-to-speech software).
Online proctoring services that combine AI software with human proctors can help ensure that exams are proctored and that students feel supported to successfully complete the exam.
Here’s an example of how to combine LMS settings, online proctoring, and assistive devices to help students complete the online exam.
Before the online exam the instructor can collect specific student accommodations if provided by Disability Services, such as:
- Jane Smith may use a screen reader during the exam
- John Doe may use talk-to-text technology for the essay portion of the exam
- Jane Smith will have an interpreter in the room
- John Doe does not have a photo ID, please bypass ID verification
- Jane Smith is allowed three 5-minute breaks
- John Doe is permitted to wear religious attire during the exam
Accessibility Tips for Online Exams
Use appropriate color contrast
All online exam
content should use appropriate color contrast which makes it easy to
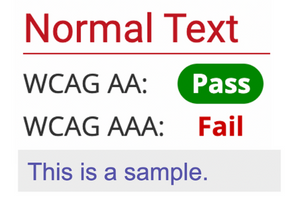
see the text color against the background color. To see an example of the importance of color contrast, font size,
and various standards, the color contrast below uses a purple font
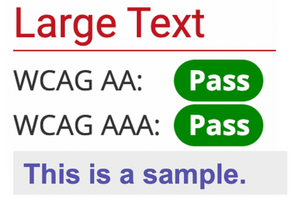
against a gray background. The color contrast ratio between the text color #555AA and the background color #EDEDED shown in the example below is 5.49:1, which passes the Web Content Accessibility Guidelines (WCAG) AA contrast ratio but fails for WCAG AAA for Normal Font size. For purposes of public higher education, WCAG AA (minimum) is required.
- WCAG AA requires at least 4.5:1 for normal text and 3:1 for large text.
- WCAG AAA requires at least 7:1 for normal text and 4.5:1 for large text.
Keep the WCAG AA and WCAG AAA contrast pass/fail requirements in mind for the examples below.

Color contrast ratios and other accessibility compliance standards can be tricky, so use available accessibility tools and resources to make sure you meet the minimum requirements.
Use accessible font types, sizes, and letter spacing
Use Sans Serif fonts, not Serif Fonts
Sans Serif
fonts are typically easier to read because they don’t have small lines
at the ends of the letters like Serif fonts do.

Make sure that font sizes are aligned with WCAG standards
According to WCAG, the minimum font size is 12-14pt and large font size is 18pt and above.
However, some fonts are inherently larger than others, even when they have the same font point, like in the example below. The example uses two Sans Serif fonts at a 16-point font size. The top sentence is in Arial font, and the line below is in Calibri font.

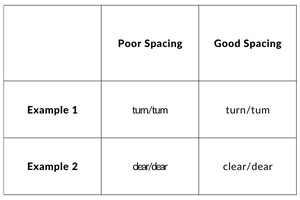
Pay attention to letter spacing
Even when using
the correct font type, pay attention to the spacing between each letter.
The example below shows how letter spacing can make some words
difficult to read.
The words used on this chart:
- Example 1: turn and tum
- Example 2: clear and dear
Provide text alternatives for any multimedia used
If
any of your online exams include multimedia content, such as videos,
audio, or images, make sure that you provide text alternatives to help
students perceive and understand the content.
Create captions and/or subtitles for videos
Use text alternatives such as captions and subtitles to help students better understand the content.
Captions and subtitles are similar but different:
- Captions provide concise speech and non-speech elements, such as a dog barking, to help give additional context.
- Subtitles accurately provide what is said in the video.
Tip for videos: Don’t use videos or animations that flash or blink because they can cause seizures.
Provide audio descriptions
Audio descriptions are a text version of important visual aspects in the video.
Add image descriptions
Add descriptions to images to provide context and purpose in about 125 characters or less. Do not start the description with the words "A photo of..." or "A drawing of..." because the screen reader already can determine that information.

Image Alt-Text Example:
- Poor Alt-Text: Person hiking.
- Good Alt-Text: Man wearing a backpack while hiking up a steep mountain covered in snow.
Stay up-to-date on what’s changing
This article covers some high-level aspects of creating accessible online exams, but as online learning and technology continue to evolve, be sure that you stay up-to-date on web accessibility because what you create today may be out of compliance next semester.