Friday, March 19, 2021

Changes to Video Downloads in Kaltura

Changes to Video Downloads in Kaltura

We recently upgraded our Kaltura player from version two to version three. The primary change for faculty and students are the new downloading options when embedding videos. 

With the changes in the Kaltura player, embedded videos now default to no download capabilities. If you don't want your videos to be downloaded, you don't need to change anything about how you embed your videos.

To Download or Not to Download

Faculty have the options to make their Kaltura videos downloadable so that students can take them on the go or download them when on wifi for a chance to watch later when their connections may not be so stable. 

Some content creators, however, do not want their videos to be downloadable so that their content cannot be shared without their consent. The update allows this decision to be made on a video by video basis.

Which method you choose is up to you, but if you would like to learn how to make your videos downloadable, please read on. 

How to Embed a Kaltura Video with or without Download Capability

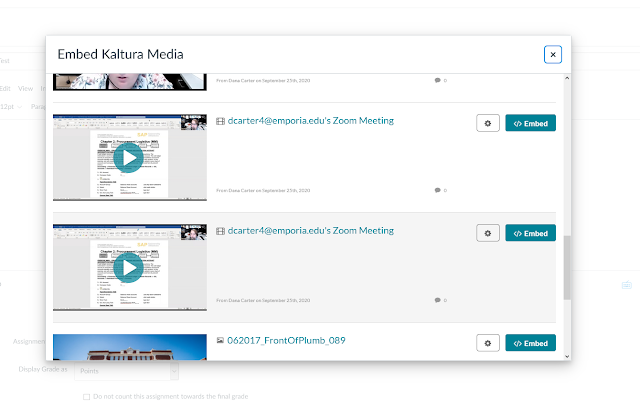
If you do want your videos to be downloaded, you can do this by selecting the gear icon next to the embed button within the Embed Kaltura Media window in Canvas, as included below:

Embed Kaltura Media with Gear Icon

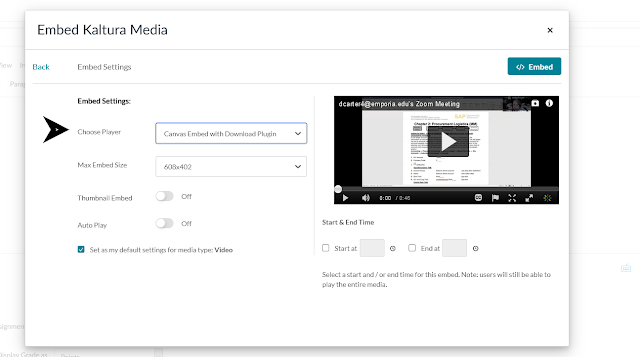
Once you select the gear icon, you will be taken to another window called Embed Settings. Kaltura videos default to embedded without download capabilities. If you would like to change this, you will need to locate the Choose Player field and select Canvas Embed with Download Plugin before selecting the Embed button in the upper right, as demonstrated below:

Canvas Embed with Download Option


After selecting embed, your videos can now be downloaded by students! Let Learning Technologies know if you have any questions.

Friday, March 12, 2021

March Canvas Updates

March Canvas Updates
 

There are some pretty major updates coming to Canvas on March 22nd. Let's dig into them below!

New Feature: Webcam Submissions

When submitting an assignment, students can submit an image of an assignment or project via their computer's webcam. Learn more about it in the following short video from Canvas:

Updated Feature: Course Availability

Course dates can now be set by term, not just by date. Instructors will still be able to use specific dates, but they also have the option to set availability by the standard term dates. The following video covers this feature update:


Updated Feature: Learning Mastery Filters

Instructors can now filter the Learning Mastery Gradebook to find students whose courses have concluded or are inactive. This is useful for determining which students have mastered content or learning objectives. Watch the Canvas video for more information:


Updated Feature: RCE File Preview Enhancements

When uploading files in the rich content editor, users can now see a preview of the file inline or in an overlay. This change allows users to control the display of the file preview. Previously all file previews opened in a new browser tab. Canvas covers it more fully in the following video:


Updated Feature: SpeedGrader Submission Reassignment

This change allows instructors to provide feedback and reassign an assignment to an individual student, which places the assignment back in the List View Dashboard as another assignment to complete.

For online assignments with a due date, instructors can view a Reassign button in SpeedGrader. If they require a student to redo an assignment, they can reassign the assignment directly to the student from within their grading workflow in SpeedGrader. The instructor must first provide feedback regarding the assignment, which will enable the button. The reassignment does not change the original due date for the student.

Notes

  • The Reassign Assignment button is not available for External Tools (LTI), on paper, and no submission assignments.
  • The Reassign Assignment button is only available for assignments with due dates.
  • If an instructor returns to SpeedGrader after navigating away from the page, the Reassign Assignment button shows that the assignment has been reassigned.
  • If the assignment's settings do not allow students to make an additional attempt, the Reassign Assignment shows that the assignment is not able to be reassigned.

When an assignment is reassigned, students see the assignment in the List View Dashboard with the instructor’s feedback. Students can resubmit the assignment and submit for additional feedback from their instructor.


 If you have any questions about these changes, please contact Learning Technologies!

Thursday, March 4, 2021

How to Annotate a PDF in Canvas

  How to Annotate a PDF in Canvas

Would you like to have your students annotate a PDF for an assignment in class? Turns out there's a simple way to do this, though certain steps may seem counterintuitive. 

How to set up the assignment

To create a PDF annotation assignment, you'll create a new assignment and add the PDF to it. Include any directions necessary for the completion of the assignment, assign points, and assign the assignment to all students or the correct group of students.

You will want to choose the assignment submission type of Online and then choose File Upload. You can further restrict this so that students can only upload a PDF. Then save and publish the assignment. You can watch all these steps in the video below:


How students complete the assignment

Student will complete the assignment by first downloading the PDF and then submitting the blank PDF. (Remember I said this would seem counterintuitive?) The student will then go to Submission Details in the upper right hand corner and then select View Feedback on the next screen. This will then open the submitted PDF.

In order to enlarge the PDF for annotation, the students should then select the full-screen button (it looks like a diagonally pointing arrow) and then they will have access to the annotation tools. They can highlight text, add text to the PDF or use the strikethrough function, use a paintbrush, create a box around something, or add a comment that will show outside of the document. Sizes and colors can be altered on most of these functions. 

Once the student is finished with his or her annotation, they can leave the full-screen view, close the PDF, and choose Resubmit Assignment to complete the assignment.


So there you have it! Can you think of a reason why you might use this functionality? Try it out! And as always, if you have questions, don't hesitate to contact Learning Technologies!